The Upgrade We Almost Skipped
When you're staring down a kitchen renovation budget — cabinets, counters, appliances, plumbing — cabinet hardware feels like an afterthought. A line item you'll get to eventually. Something you can buy at the hardware store on a random Tuesday when the kitchen is finally done.
I understand the impulse. I had it myself. Our IKEA cabinets came with simple chrome knobs, and for the first few months after we finished the kitchen, I told myself they were fine. Functional. Nobody notices cabinet hardware, right?
Then I swapped them out in a single Saturday afternoon for under $200, and the kitchen felt like a different room. Derek walked in, paused, and said, "Wait. What did you do? It looks expensive in here."
That's the power of cabinet hardware. It's the smallest gesture that telegraphs the biggest intention. And it's the renovation decision I now tell every friend to make first — before painting, before replacing counters, before doing anything more expensive.
What We Swapped and What It Cost
Item | Original | Replacement | Cost |
|---|---|---|---|
Cabinet knobs (18) | IKEA chrome, 3/4" round | Schoolhouse Electric "Avery" knob in warm brass | $7 each = $126 |
Drawer pulls (6) | IKEA chrome bar, 3" | Rejuvenation "Edge" pull in warm brass, 5" | $11 each = $66 |
Appliance pulls (2) | None — used cabinet knobs | Rejuvenation "Edge" pull in warm brass, 12" | On clearance = $14 total |
Total | $206 |
One Saturday. One screwdriver. Two hundred and six dollars. That's the entire investment.

The Sizing Rule Nobody Tells You
I learned this in my first year at the firm, from a senior designer who watched me specify drawer pulls that were technically correct and visually wrong. She walked over, held up a sample, and said, "The pull should be about one-third the width of the drawer. No shorter than a third, no longer than half. That's the sweet spot."
Here's why it matters. A pull that's too short looks cheap and is uncomfortable to grip. A pull that's too long overpowers the cabinet face and makes the drawer feel smaller than it is. The one-third rule creates a visual rhythm that your eye reads as "intentional" even if you can't articulate why.
I measured every drawer face in our kitchen, divided by three, and bought pulls in the closest available size. For our 15-inch drawers, that meant a 5-inch pull. For the tall pantry door, a 12-inch pull that echoes the proportions of the cabinet below.
Mixing Metals Without Making a Mess
Our faucet is matte black. Our cabinet hardware is warm brass. Our light fixtures are a mix. This used to be a design rule break — "don't mix metals" — and it's now so common that a single finish across an entire room can feel flat.
The key is not matching. It's repeating. Each metal finish should appear at least twice in the room, and they should be placed at different heights. The matte black faucet is at counter height and repeats at the under-cabinet lighting trim. The warm brass pulls are at cabinet level and repeat in the dining room light fixture visible through the cased opening. Your eye reads the echoes, not the differences.
Finish | Where It Appears | Why It Works |
|---|---|---|
Matte black | Kitchen faucet, under-cabinet light trim, window hardware | Grounds the room at counter height |
Warm brass | Cabinet pulls and knobs, dining room pendant (visible through opening) | Adds warmth at cabinet and ceiling level |
Brushed nickel | Toilet paper holder in adjacent bathroom (visible from kitchen) | Ties adjacent spaces together |
How to Pick Hardware You Won't Regret
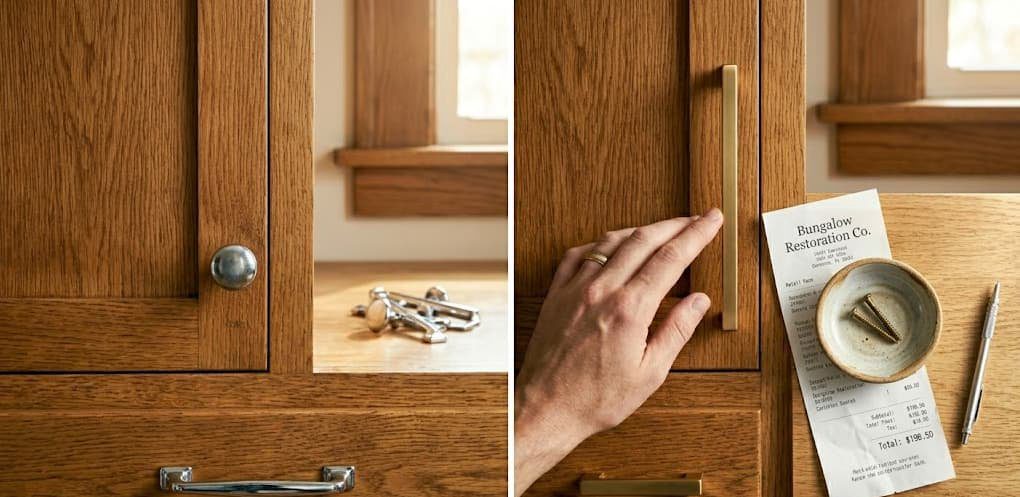
Before you buy, do what I do: hold the pull in your hand. Open a drawer with it. Curl your fingers around it. Does it feel substantial or hollow? Does the edge catch your hand? Does the finish feel like it will wear well — or does it already show fingerprints in the store?
I chose unlacquered brass for its warmth and because it develops a patina over time. It changes slightly with use, which I love. But if you prefer a finish that stays exactly as you bought it, choose a lacquered brass or a matte black with a baked-on finish. Both of those wipe clean and don't shift over years.
Also, think about your future self. If you have small children, avoid pulls with sharp corners at toddler-head height. Our five-inch Edge pulls have softly squared edges — enough to feel modern, but not enough to leave a mark if Leo bumps into one while running past the island.

The Gift You Give Your Hands
Cabinet hardware is the one finish in your kitchen you touch dozens of times a day. Every time you reach for a plate, pull out a drawer, open the pantry — your hand finds it. A beautiful, well-weighted pull is a small daily pleasure. A flimsy, uncomfortable one is a tiny daily annoyance.
For $200 and an afternoon of work, you can trade one for the other. Few renovation decisions offer that much return for that little investment. If your kitchen has builder-grade knobs and you've been tolerating them because hardware doesn't feel like a priority — consider this your permission slip to prioritize it anyway.
Your hands will notice. Your kitchen will notice. And you'll find yourself touching the cabinets just to feel that quiet, satisfying click.
Take your time — your house will still be here tomorrow.


No notes yet — write the first one.