Why I Sketch First — Every Single Time
I have a small confession: I’ve never used graph paper. Not in design school, not during eight years of client projects, and certainly not while planning our own 1920s bungalow. The grids make me feel like I’m filling out a form rather than imagining a life. Instead, I sketch every room in a worn watercolor notebook — and I sketch it long before a single piece of furniture gets moved.
Derek calls it my “thinking on paper” ritual. Emma calls it “mommy’s coloring book.” I call it the single most important step most DIY renovators skip.
Here’s the thing: software is precise, but paper is forgiving. A watercolor sketch lets me work through possibilities without committing. It’s slow on purpose — and that slowness has saved us from expensive layout mistakes more times than I can count.
What You Need (Almost Nothing)
You don’t need an architecture degree or expensive tools. Here’s what I actually use.
Tool | Why This, Not That |
|---|---|
Mechanical pencil (0.5mm) | Fine lines let me erase and adjust endlessly without tearing the paper |
Small watercolor set (8 colors) | A few washes of color communicate light, flow, and zones faster than labels |
Metal ruler (6-inch) | For scaling walls and windows — I work at roughly 1/4 inch = 1 foot |
A5 watercolor notebook | Portable, lies flat, handles light washes without buckling |
A good eraser | Because my first layout is never the right one |

Step 1: Measure the Room, But Only What Matters
I don’t measure everything down to the quarter-inch. I focus on the fixed elements: wall lengths, window and door placements, radiators or vents, and anything that can’t move — like the structural beam in our living room that ate six months of our renovation timeline. I write these numbers directly on the sketch edges, not in a separate list. Keeping measurements on the same page means I’m less likely to misplace a critical dimension later.
Step 2: Draw the Empty Shell — and Sit With It
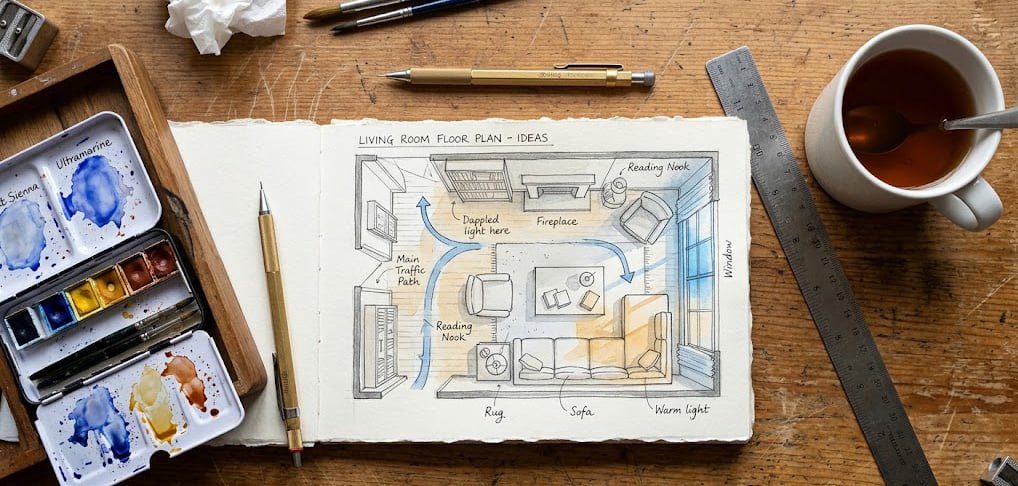
Before I draw a single piece of furniture, I outline the empty room and mark three things with arrows: natural light direction, the main entry point, and the natural walking path someone would take if the room were empty. These three arrows tell me more about how a room should function than any furniture catalog ever could.
I learned this in my second year as a junior designer, watching a senior architect trace traffic patterns with her finger on a floor plan. She said, “If you don’t know how people will move through the room, you don’t know anything yet.” I’ve never forgotten it.
Step 3: Furniture in Pencil, Traffic in Paint
Now comes the part Emma loves. I sketch furniture outlines lightly in pencil — sofa, chairs, tables, shelving — and then switch to watercolor. A thin blue wash traces the main circulation path. A softer ochre wash shows where sunlight lands. Green marks the zones I want people to linger in. The colors aren’t decorative; they’re diagnostic.

This is the moment where bad layouts reveal themselves. If a blue traffic line cuts diagonally through a seating area, the room will never feel calm. If no ochre reaches the reading chair, that corner is probably too dark. The paint tells the truth that furniture showrooms don’t.
What This Method Caught in Our Own House
When I sketched our living room this way, the watercolor immediately exposed two problems. First, the natural walking path from the front door cut directly through where we’d planned a conversation area. Second, the only ochre-worthy sunlight in winter landed on a wall we’d designated for a TV. We flipped the layout entirely — sofa facing the window, TV on the opposite wall, conversation zone shifted six feet south. That one sketch saved us from a room that would have felt vaguely uncomfortable for years.
You Can Steal This, Even If You’re Not a Designer
You don’t need to draw beautifully. You need to draw honestly. Start with an empty room, trace the light and the paths, and only then place your furniture. Do it before you pack a single box or buy a single sofa.
It costs nothing but an afternoon, a notebook, and the willingness to sit quietly with a space before imposing your will on it.
Take your time — your house will still be here tomorrow.
No notes yet — write the first one.